Two years after launch, a payments SDK needs a native upgrade while one platform owner is already blocking three releases. The queue adds review time, delays the store build, and leaves the checkout team waiting on code below the shared UI. Framework selection begins with the code and teams that will own upgrades, incidents, and platform changes after the prototype has disappeared.
Flutter vs React Native vs KMP: this comparison evaluates three ownership models that solve overlapping mobile problems. Flutter owns rendering and most application code. React Native owns application behavior in JavaScript while native views and modules remain part of the runtime. Kotlin Multiplatform, or KMP, lets a team choose exactly which logic and, with Compose Multiplatform, which UI to share.
That distinction changes the decision. Evaluate where product behavior lives, how often code crosses a native boundary, who debugs the handoff, and how much platform divergence the product can afford. The resulting architecture record needs owners, kill criteria, and evidence from camera throughput, payment recovery, accessibility traversal, and an SDK upgrade rehearsal.
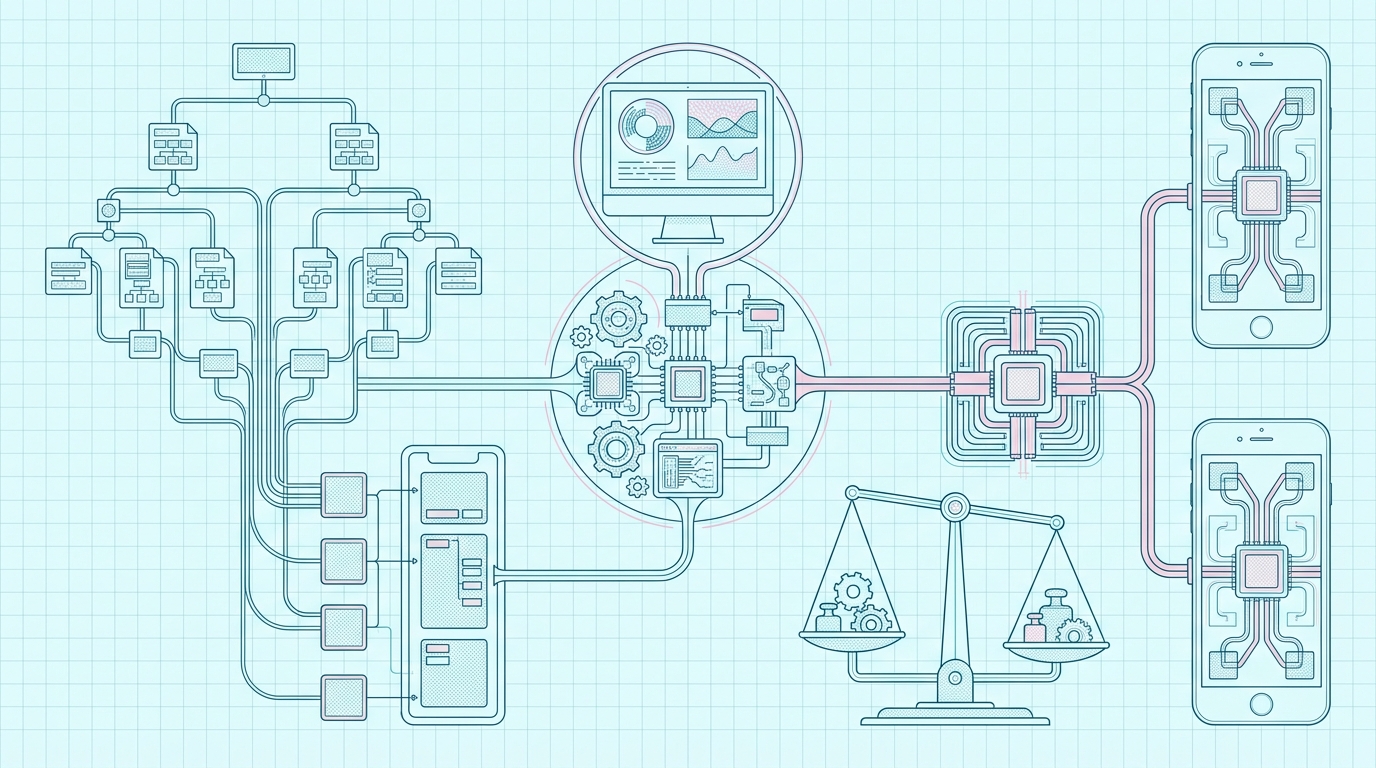
This analysis adds practical tools that shallow comparisons usually miss. A rendered ownership diagram traces product behavior through UI, shared state, interop, native code, vendor services, and release evidence. The boundary-tax model estimates integration risk before a plugin becomes load-bearing. A weighted decision matrix can then be recalculated for the actual team. It also forces the difficult questions into the review: synchronous native calls, lifecycle mismatches, accessibility divergence, and migration lock-in.
- Engineering leaders choosing a stack for a new iOS and Android product can use the scoring model.
- Native teams considering gradual code sharing can test whether KMP fits their existing architecture.
- React and Flutter teams can identify native-boundary risks before committing to plugins.
Current versions matter because old comparisons describe architectures that no longer exist. React Native 0.86 is the current stable release. It accepts Metro ^0.84.2 as a framework dependency, while Metro 0.87.0 is the current standalone bundler. React Native 0.86 also adds Android 15+ edge-to-edge fixes, first-class JSI typed arrays, and the W3C-aligned 104 ms default threshold for PerformanceObserver event entries.
Flutter 3.44.7 is the current stable SDK line. Impeller is the only supported iOS renderer and the default on Android API 29 or later; Android devices below that level, or without Vulkan support, fall back to the legacy OpenGL renderer. Kotlin 2.2.0 is the current stable compiler. Compose Multiplatform supports shared UI on Android, iOS, and desktop, with web support still in beta.

Who Owns a Crash Below JSI?
A crash below JSI arrives in the native stack even when the product behavior was written in React. Flutter plugin failures cross from Dart into platform code, while a KMP feature may cross Kotlin-to-Swift and then into a native interface. The first triage artifact follows the runtime: native stack for JSI, platform exception for a Flutter plugin, or Kotlin/Swift evidence at the KMP facade.
Follow one camera feature through the diagram. Flutter keeps preview rendering and application state in Dart and Impeller, whose documentation says shaders compile at engine-build time; capture still crosses a plugin into native camera APIs. React Native places the component tree above Fabric and sends the frame path through JSI or a TurboModule. The architecture guide sizes a typical frame buffer at about 30 MB, roughly 0.9 GB per second at 30 fps, so the trace stays native until compact results reach JavaScript.
KMP can share the detection rules and persistence while SwiftUI and Jetpack Compose retain preview ownership. Compose Multiplatform moves more UI into shared code, creating a distinct candidate. JetBrains’ comparison says Compose Multiplatform is stable on Android, iOS, and desktop with web in beta; its survey usage rose from 7% to 18% across the two latest Developer Ecosystem surveys. For this camera flow, the layer inventory records preview, frame producer, detection model, persistence, cancellation, and release symbols.
| Decision dimension | Flutter 3.44 | React Native 0.86 | KMP / Compose |
|---|---|---|---|
| UI ownership | Flutter renderer | React tree plus native runtime | Native UI or shared Compose UI |
| Primary language | Dart | TypeScript plus native code | Kotlin plus Swift when UI stays native |
| Incremental adoption | Possible, but engine embedding adds weight | Strong brownfield path | Strongest for sharing one domain slice first |
| Native fidelity | Reproduced by widgets | Native-backed component model | Exact with native UI; configurable with Compose |
| Best organizational fit | Unified product squad | React-heavy organization | Existing native teams sharing domain logic |
Camera streaming changes the table’s result because its high-volume native path outweighs broad UI reuse. A branded retail interface shifts the pressure toward rendering control, where Flutter can keep campaign layout and motion consistent. React Native gains most when React staffing is abundant and native module ownership is funded; KMP gains when established platform teams can retain their interfaces while sharing domain work.
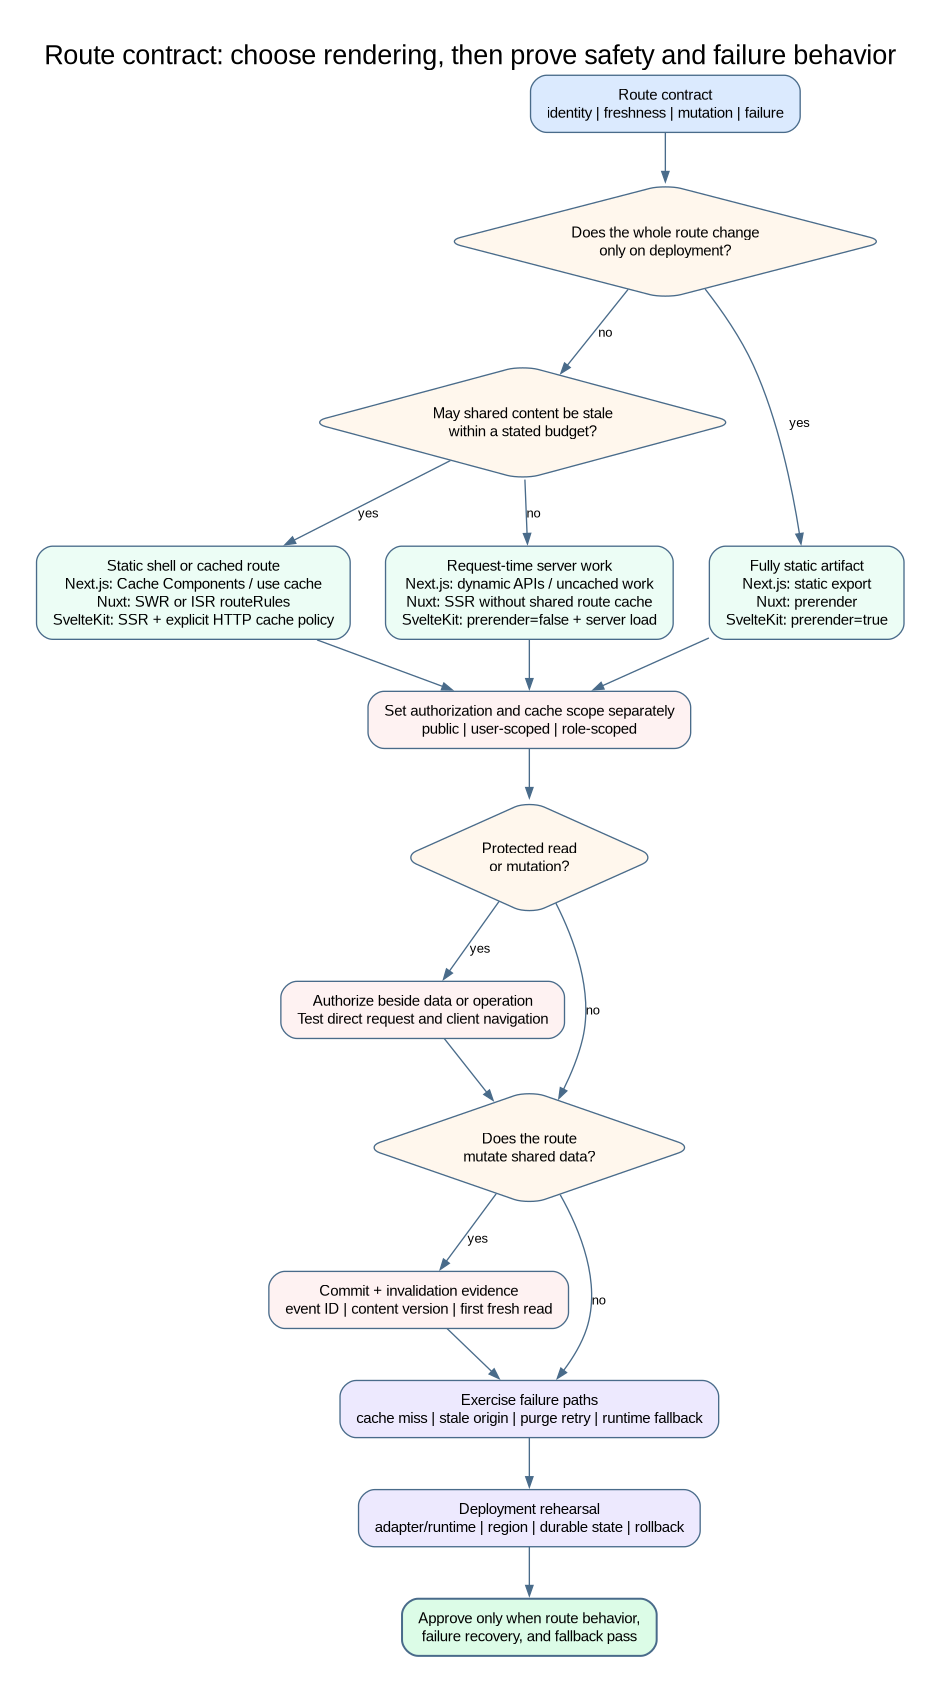
Reading the ownership diagram from left to right
The rendered diagram places product behavior upstream of UI, shared state, interop, native code, and vendor services. Release evidence crosses those layers through CI, symbols, and traces. For a production passkey flow, the nodes become navigation, shared authentication state, Keychain or Android Keystore, the native credential prompt, telemetry, and server-side token rotation.
During an incident rehearsal, the team finds no owner between prompt completion and token persistence. The exercise stops until platform and domain engineers identify the callback repository, release process, and trace event; those fields are then added to the diagram. Process death can interrupt the later native-callback and restored-navigation transitions, so each receives a separate edge and a recovery assertion.
A checkout failure may pull a Dart engineer, an iOS engineer, a plugin maintainer, and the payments vendor into the same incident, creating four operational owners for one shared feature. A KMP validation bug may be fixed once in common code, while both platform teams still perform separate acceptance testing. In React Native, the feature lead receives the business alert; the crash below JSI arrives separately as an unsymbolicated native stack until the iOS owner uploads the matching dSYM.
The diagram exposes a staffing constraint hidden by the framework label.
Ten React engineers can keep the shared interface queue moving while one overloaded iOS specialist owns every custom module. Put that name beside each boundary and replay the release plan with the owner unavailable. Modules without a second reviewer become migration liabilities; features that can use maintained platform APIs remain viable. The architecture review can now choose between training another owner, hiring native capacity, removing the module, or rejecting the candidate before launch depends on one person.
Benchmark Contract
journey: authenticated_watchlist_return
rows: 500
build: release
samples: 30
report: [cold_start_p95, slow_frame_ratio, biometric_return_p95, process_recovery_p95]
devices: [android_mid, ios_current_minus_3]
Picture the test run: launch cold, unlock a portfolio, scroll 500 updating rows, leave for biometric approval, let the operating system reclaim the process, then return to the same account state. A candidate fails when any step breaks the product budget, even if its isolated animation demo looks smooth.
The thresholds in the YAML are product acceptance criteria rather than published framework benchmarks. Every result keeps its device class, sample count, percentile, application state, and thermal state.
Published startup and memory figures often omit device state, build mode, thermal conditions, asset sets, and run distributions. A workload contract records those fields beside the interactions where delay or instability would damage the product, then repeats them on representative low, middle, and high-end devices.
For a brokerage app, the contract might include cold launch into an authenticated portfolio, a 500-row updating watchlist, secure key access, and recovery after process death. A creative editor needs gesture latency, shader compilation behavior, image memory pressure, and export isolation. A field-service tool cares more about offline transactions, camera handoff, GPS in the background, and a seven-year-old Android fleet.
# performance-contract.yaml
scenarios:
  - name: authenticated_cold_start
    percentile: p95
    budget_ms: 1200
    devices: [android_mid, ios_current_minus_3]
    build: release
  - name: live_watchlist_scroll
    frame_budget_ms: 16.67
    allowed_slow_frame_ratio: 0.01
    duration_seconds: 120
  - name: process_death_recovery
    maximum_data_loss_events: 0
    recovery_budget_ms: 1800
native_boundaries:
  - secure_storage
  - push_notifications
  - biometric_auth
  - market_data_stream
Suppose the first cold-start sample favors Flutter and a later warmed-device sequence reverses the order. That hypothetical result is a prompt to randomize candidate order and repeat the run, rather than evidence that either framework is faster. KMP with SwiftUI and Jetpack Compose measures native rendering plus shared domain work, while Compose Multiplatform remains a separate candidate. Across 30 release-build samples, device models, medians, tail percentiles, and thermal state expose whether the reversal survives replication; simulator data stays in the raw log.
Instrument the contract with platform tools
Use the profiler closest to the bottleneck. Android Macrobenchmark and Baseline Profiles can measure startup and critical journeys without relying on debug builds. Instruments exposes iOS launch, allocations, hangs, energy, and signposts. Flutter DevTools helps inspect frame timing, CPU work, memory, and widget rebuilds. For a Fabric stall, the trace begins in the React commit, crosses the mounting layer, and ends on the native main thread; React profiling and platform timestamps share one correlation identifier.
Watch p95 across time to initial display, time to interactive, slow-frame ratio, and frozen-frame ratio because cold initialization and later thermal behavior affect different samples; memory snapshots after cache population, backgrounding, and repeated third-party navigation show whether each cycle retains another native object.
If a candidate leads the first animation run and falls behind after the device warms, the next action is a randomized sequence with a recorded cooldown. A repeated reversal makes performance non-discriminating for the framework decision until the team can isolate renderer work from application code and device power policy.
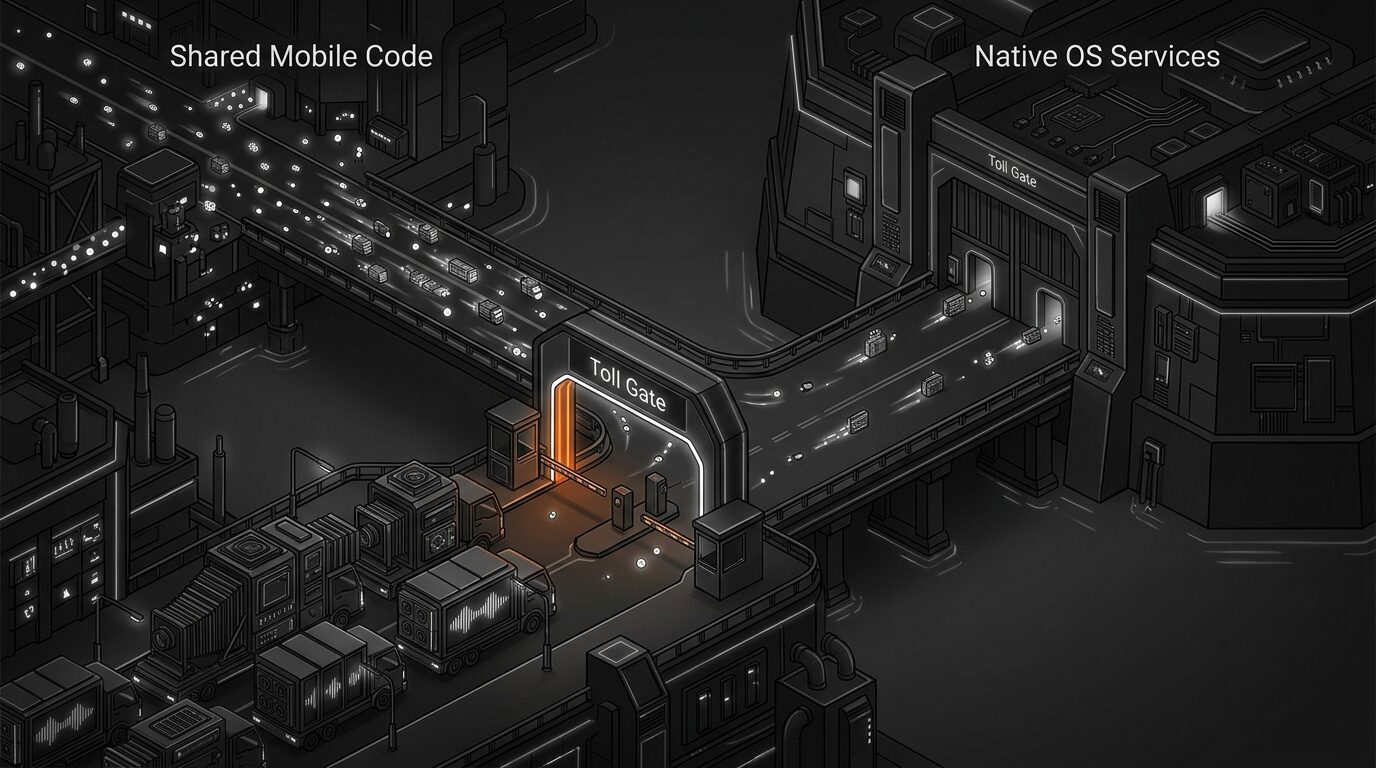
Native Boundary Cost Model
Boundary tax: frequency x payload + lifecycle coupling + vendor volatility. The formula ranks interop risk from four inputs that change independently. Thread switching, object conversion, and observability gaps remain annotations on the score because they need traces rather than ordinal guesses.
React Native’s JSI removes the legacy bridge’s mandatory asynchronous serialization by allowing JavaScript and C++ to hold references across the runtime boundary. Flutter offers platform channels and lower-level FFI. Kotlin/Native exposes Objective-C and Swift interoperability. Now apply the formula to a camera preview dismissed mid-frame: the producer retains a native buffer, shared work is queued, and the UI consumer disappears. Production, boundary receipt, result publication, and cancellation acknowledgement reveal whether teardown completed.
This article’s triage rubric assigns the camera boundary 5 x 5 + 4 + 2 = 31. These author-defined ordinal inputs rank integration exposure across frequency, payload, lifecycle coupling, and vendor volatility; traces provide the performance measurements. A one-shot permission request receives lower assumed inputs because its payload is small and its lifecycle ends with one response.
The score breaks down when two boundaries both equal 15 but fail differently. A payment callback with low payload can lose a terminal transition, while a camera path can saturate memory without losing an event. Add three severity fields beside the numeric score: lost business transitions, peak retained bytes, and cancellation timeout. The payment boundary stores one lost terminal event; the camera boundary stores roughly 30 MB retained per frame until teardown.
Computer-vision preprocessing can run beside the native camera and publish compact detections to shared UI state. That keeps the roughly 30 MB frame buffers cited by the React Native architecture guide out of a convenience message path, where 30 frames per second would move data at roughly 0.9 GB per second. Bluetooth packets, audio buffers, and token streams need their own payload and cancellation traces before crossing.
Specify cancellation and backpressure
Interop designs often document success values and ignore what happens when the consumer disappears. Suppose an iOS screen starts a shared Kotlin flow, then the user dismisses it while a callback is pending. Who cancels the producer? Which scope owns it? Can the callback retain the view controller? Similar questions apply to a TurboModule promise after React unmounts and a Flutter stream subscription after a route is disposed.
Sensor streams use route-scoped cancellation and drop-oldest buffering because freshness matters. Payment status preserves every transition under an account-scoped owner. Audio receives a bounded real-time buffer. These policies map directly to the owner, buffer, cancellation, and terminal-error fields in the boundary record.
Also trace both sides with one correlation identifier. Record four timestamps: shared emission, native receipt, vendor callback, and UI publication. The boundary review can then attribute latency to conversion, the vendor queue, or main-thread work without inventing a framework-wide benchmark from one trace.
Why Did VoiceOver Skip the Product Name?
VoiceOver: “$19.99. Buy button.”
Tester: “The product name never appeared.”
The captured semantic tree places the discounted price before a hidden product label and the action. Responsive layout moved the price visually, and traversal replay reproduces the sequence three times.
A global retail brand may require identical layout, animation, and campaign timing on iOS and Android. Flutter’s owned rendering model fits that policy. The team can test golden images, ship one widget implementation, and keep motion language consistent. An iOS control copied from Android can still violate expected navigation, focus, or dismissal behavior even when every pixel matches the design file.
A banking application may treat platform conventions as a security and trust signal. SwiftUI can adopt iOS navigation, accessibility, text sizing, and system presentation behavior directly, while Jetpack Compose follows Android conventions. KMP can share validation and transaction rules without forcing those interfaces together. The cost is real: UI work remains platform-specific, and coordination replaces code reuse.
React Native uses a component model familiar to React engineers and integrates with native views. It works well when the product’s design system already abstracts platform differences thoughtfully. Problems appear when a team assumes a shared JSX tree guarantees identical behavior. Focus order, keyboard avoidance, modal presentation, text metrics, and screen-reader semantics can still diverge.
VoiceOver reaches the price before the product name
On a retail card, VoiceOver announces a discounted price and action button before the product name because three visually adjacent widgets became separate semantic nodes in the wrong order. The screen still animates smoothly. Fixing the traversal may require a merged semantic container in Flutter, adjusted accessibility props in React Native, or separate native modifiers in a KMP project with SwiftUI and Jetpack Compose. Repeat the same journey with extreme text sizes, reduced motion, high contrast, switch control, TalkBack, and a hardware keyboard.
Flutter merges the card into one semantic container, while React Native keeps its shared component and applies platform-specific ordering. KMP took a second day. SwiftUI needed a combined accessibility element; Jetpack Compose used traversal metadata, followed by replay of the recorded VoiceOver and TalkBack journey on both platforms.
Twelve Engineers, Two Very Different Teams
The first 12-person team has eight web-focused React engineers, two Android engineers, and two iOS engineers. Its UI queue is wide; its native review queue has two owners per platform. The second team reverses that shape with four Android engineers, four iOS engineers, two backend engineers, and two designers.
Team one: React Native. Eight engineers can work on interfaces; four platform specialists absorb native modules. Flutter adds Dart learning. KMP leaves the UI queue with the existing iOS and Android group, so domain consistency improves before interface throughput does.
Team two already has eight platform engineers. KMP fits that shape because serialization, domain rules, feature flags, and persistence move into common code without retraining both interface teams; replacing their current skills with React Native or Flutter creates the larger transition.
The following planning equation separates shared implementation from platform, boundary, coordination, and learning costs:
from dataclasses import dataclass

@dataclass(frozen=True)
class DeliveryEstimate:
    shared_feature_days: float
    platform_specific_days: float
    boundary_days: float
    coordination_days: float
    learning_days: float

    def total(self) -> float:
        return (
            self.shared_feature_days
            + self.platform_specific_days
            + self.boundary_days
            + self.coordination_days
            + self.learning_days
        )

candidate = DeliveryEstimate(
    shared_feature_days=18,
    platform_specific_days=10,
    boundary_days=7,
    coordination_days=5,
    learning_days=12,
)
print(f"Estimated team-days: {candidate.total():.0f}")
Estimate one representative feature with analytics, accessibility, tests, release configuration, native permissions, crash reporting, and upgrade work included in the same total. Then change the workload. An onboarding screen may favor shared UI, while background location adds permission changes, process recreation, and native lifecycle ownership; the difference between those estimates is more useful than extrapolating one easy feature across the roadmap.
An onboarding estimate may remove two platform implementations while preventing few duplicated defects because most shared work is formatting. Payment recovery changes the model: one state machine can own idempotency and terminal status for both applications. A later background-location feature adds process recreation and vendor SDK work, sending much of the delivery effort back to platform owners. Estimate all three before extrapolating one easy screen across the roadmap.
Upgrades Have Five Clocks
Model an upgrade rehearsal with five independent clocks: operating-system SDK, native build tools, framework release, wrapper maintainer, and vendor binary. A payment wrapper can still target the prior toolchain after the framework itself passes CI, leaving the vendor and wrapper release schedules in control of the store deadline. Record actual dates during the next beta cycle instead of assuming those clocks advance together.
The New Architecture became the default in React Native 0.76, and current releases keep Fabric, JSI, and TurboModules as the supported model. The React Native 0.86 release records Android 15+ edge-to-edge repairs across measureInWindow, KeyboardAvoidingView, Dimensions, StatusBar, and navigation-bar contrast. It also fixed BackHandler registration after resume on Android API 36+, networking failures on very large HTTP responses, and blob URLs under the New Architecture. Those are ownership tests: resume the app before exercising back navigation, stream an oversized response through the real networking path, and open a blob URL in the release build. An abandoned module leaves the application team responsible for the native repair, so brownfield approval should name an engineer and replacement path for every critical dependency.
Flutter plugins vary in quality because many wrap vendor SDKs with different release schedules. The official migration index lists concrete 3.44 changes, including built-in Kotlin migration for Android projects and multiple API deprecations. A payment, maps, Bluetooth, or identity plugin can become the critical path after an iOS or Android update. Read its native source before approval and verify release builds, lifecycle cleanup, thread dispatch, and error propagation. Without an internal maintainer, the next SDK deadline can trigger an emergency native patch with unclear review and incident ownership.
KMP moves dependency risk into a smaller but growing multiplatform ecosystem and into native interop. The exact Kotlin 2.2.0 row in the Kotlin Multiplatform compatibility matrix lists Gradle 7.6.3 through 8.14 and Android Gradle Plugin 7.3.1 through 8.10.0. Newer rows on the same page describe different compiler releases and mustn’t be combined with the registry-confirmed 2.2.0 toolchain. Its Apple-toolchain boundary also trails newer Xcode releases, so the precise combination needs a CI proof before commitment. Swift-facing APIs become awkward when coroutines, sealed classes, generics, or Kotlin-specific error types escape without an intentional facade.
| Beta checkpoint | Observed blocker | Recovery |
|---|---|---|
| SDK beta 1 | Wrapper targets prior native toolchain | Wait for maintainer |
| SDK beta 2 | No internal wrapper owner | Integrate vendor SDK directly, add symbols and accessibility pass |
The diary also stores maintainer, license, permissions, exit path, and release days consumed. Automated dependency and security scanning supplies abandonment signals.
Official release pages should anchor version claims: Flutter 3.44 release notes, React Native 0.86 release notes, and the Kotlin Multiplatform compatibility matrix. Don’t infer cadence from an old blog post. Record each framework upgrade as a recurring capacity line, test it against the next platform toolchain, and revise the estimate from release history. That budget should include dependency replacement, native build repair, accessibility regression testing, symbol upload, and store submission rehearsal.
Checkout Returns From Another App
Lifecycle behavior is where elegant cross-platform abstractions meet operating systems that can suspend, recreate, throttle, or kill an application. Test those transitions early because a state model that works during a foreground demo may corrupt data after process death.
Four lifecycle states govern the checkout: foreground UI, external banking app, reclaimed process, and deep-link restoration. The durable artifacts are an idempotency key, pending transaction identifier, and server-confirmed terminal status. Flutter widgets, React components, SwiftUI views, and Jetpack Compose screens can all disappear between the second and third states.
| Lifecycle state | Required durable evidence | Failure if missing |
|---|---|---|
| Before handoff | Idempotency key and pending ID | Return link can’t identify payment |
| After recreation | Server-confirmed status | Duplicate charge or stale success screen |
import kotlinx.coroutines.sync.Mutex
import kotlinx.coroutines.sync.withLock

class PaymentRepository(
    private val store: PaymentStore,
    private val api: PaymentApi
) {
    private val mutex = Mutex()

    suspend fun resumePayment(idempotencyKey: String): PaymentState = mutex.withLock {
        val local = store.read(idempotencyKey)
        if (local?.isTerminal == true) return local

        val remote = api.fetchByIdempotencyKey(idempotencyKey)
        store.write(remote)
        return remote
    }
}

interface PaymentStore {
    suspend fun read(key: String): PaymentState?
    suspend fun write(state: PaymentState)
}

interface PaymentApi {
    suspend fun fetchByIdempotencyKey(key: String): PaymentState
}

data class PaymentState(val status: String) {
    val isTerminal: Boolean get() = status == "paid" || status == "failed"
}
KMP places the payment repository in common code. Flutter uses a Dart domain layer backed by durable storage, while React Native persists the pending identifier outside component state and reconciles it after runtime recreation. Each implementation runs the same recovery suite for backgrounding, process death, clock change, permission revocation, network handoff, and repeated deep links.
Make failures visible across runtimes
Checkout emits business event payment_restore_failed with build, route, device class, and correlation identifier. That identifier appears in the JavaScript or Dart log, the shared Kotlin event when present, and the native crash record. Source maps, Dart symbols, Android mapping files, and iOS dSYMs convert the final frame into a source location during the same trace.
Use one event vocabulary across platforms. A checkout restoration should emit the same business event whether SwiftUI, Jetpack Compose, Flutter, or React Native owns the screen. Attach framework version, application build, operating-system version, device class, route, and correlation identifier. Exclude sensitive payloads while preserving enough runtime context to connect the business failure with its symbolicated stack.
ANRs and hangs deserve separate treatment from crashes. Main-thread stalls may leave no exception. Android vitals, iOS MetricKit, and Flutter frame timings, and native performance traces reveal different slices of the event. If a React Native application records only JavaScript errors, or a KMP application records only shared Kotlin exceptions, the team is blind exactly where architecture boundaries matter.
The shared log ends at correlation ID pay-7f3. Native MetricKit data continues the same identifier into a main-thread stall, and the matching dSYM resolves the address to the vendor callback. The acceptance check measures time from business alert to source location and fails the pilot if missing symbols force manual address reconstruction.
After the UI process is destroyed, the first return link reconstructs checkout from the persisted idempotency key and server status. The second link finds the same terminal record and sends no payment request. Server and device both report one charge; a UI-only implementation loses the pending identifier during process death.
Score the React-Heavy Case
The architecture meeting disputes one assumption: should native SDK depth weigh 25 or 35 after launch? The launch sheet uses 25. The maintenance sheet moves ten points from shared UI delivery to native SDK depth, exposing payment integration as the deciding row.
Score each candidate from 1 to 5. Set weights totaling 100. Multiply each score by its weight, divide by five, and add the results. More important, define kill criteria before scoring. A mandatory vendor SDK without a viable integration path should disqualify a candidate regardless of its average.
| Criterion | Weight | Flutter | React Native | KMP native UI |
|---|---|---|---|---|
| Existing team fit | 20 | 3 | 5 | 2 |
| Visual consistency | 20 | 5 | 4 | 2 |
| Native SDK depth | 25 | 3 | 3 | 5 |
| Incremental adoption | 15 | 2 | 4 | 5 |
| Shared UI delivery | 20 | 5 | 5 | 2 |
This hypothetical React-heavy product gives React Native the strongest result. Change the team-fit score or make native SDK depth a kill criterion, and KMP can win. Require strict visual identity with moderate native integration, and Flutter moves ahead. Save the alternate scoring runs. The low-confidence native-SDK row carries a one-point uncertainty range, enough to move the total from React Native to KMP; the payment pilot supplies the missing value.
Under maintenance weights, KMP becomes the winner because native SDK depth and replacement cost dominate the score. The launch sheet remains attached to the record, showing exactly when the organization chose to pay for native capacity.
Define the Rollback Before Migration
The migration pilot owns one payment screen inside the existing application. It must launch the vendor flow, survive process death, restore through a deep link, emit symbolicated failures, and return navigation to the native host. The old checkout remains shippable behind a remote flag while the candidate proves these operational assumptions.
The KMP pilot shares transfer objects, API calls, validation, and persistence behind one Swift-friendly facade. Navigation stays native because an earlier prototype moved route state into common code and restored the wrong screen after iOS scene recreation. SwiftUI and Jetpack Compose keep that responsibility while the shared payment repository proves recovery.
For React Native brownfield adoption, embed a self-contained screen with a documented native contract. Confirm startup cost, bundle loading, navigation, deep links, analytics, and crash symbolication. Use New Architecture-compatible dependencies from the start because current releases don’t provide a practical legacy path. The official architecture guide records 0.76 as the release where the New Architecture became the default. It also explains the direct JavaScript and C++ references enabled by JSI. In the pilot trace, serialization disappears from the hot path while a retained native object survives React surface unmount; repeated retain-release cycles must return memory to baseline.
For Flutter add-to-app, test engine startup, memory, route handoff, plugin registration, and multiple-engine behavior where relevant. A small visual feature may work well. A deeply interleaved feature that crosses native navigation every few seconds probably creates an awkward ownership boundary.
- Select a feature with real platform integration but limited revenue risk.
- Write measurable acceptance criteria from the workload contract.
- Build release-mode prototypes for both operating systems.
- Run accessibility, lifecycle, observability, and upgrade drills.
- Record diagnosis time, missing symbols, and the repositories changed for every native-boundary defect.
- Require one terminal charge, a symbolicated native stack within the incident budget, and a rollback that preserves the on-device schema.
The payment pilot leaves one unresolved question: can the vendor SDK upgrade without creating an application-owned fork? Duplicate deep links and symbolication already have binary pass conditions. The fork result decides whether React Native keeps its launch advantage or KMP’s native ownership becomes cheaper over the maintenance horizon. For a model-heavy product, tamdd.dev’s on-device AI mobile app build guide identifies a different pilot boundary: execution path, memory pressure, and native acceleration on physical hardware.
Define the rollback before expansion
A reversible pilot needs a disable path, a data format both implementations can read, and a tested route back into the host application. Put the feature behind a remotely controlled flag while keeping business correctness independent of the flag service. If that service is unreachable during an incident, the old path still needs to open safely.
Database ownership needs special care. Two runtimes writing the same tables can violate transaction and migration assumptions. Prefer one data owner with an explicit API, or prove concurrent access semantics under process interruption. If the new module introduces a schema migration, keep a remotely controlled disable path that reads the same on-device schema. Store review may delay a binary rollback for hours or days.
Delay expansion until several releases provide maintenance evidence. Follow crash-free sessions, tail startup latency, accessibility defects, build-time change, release lead time, and native-boundary incidents, then compare them with the existing implementation. The review packet includes CI failure timestamps, symbolication output, rollback logs, and the names of the engineers who repaired each break; it is presented at the third-release checkpoint.
Where Each Framework Is the Wrong Choice
Immediate access to new platform UI disqualifies Flutter for some products. In a React Native candidate, an unsupported native payment module becomes a hard stop when nobody can maintain its iOS and Android code. KMP with native UI creates a different constraint: one small interface team inherits two backlogs and two acceptance paths.
Avoid Flutter when platform-native behavior is the product
Flutter is a poor default when a product must adopt new platform UI capabilities immediately, relies on many specialized native SDKs, or embeds deeply inside a large native application with frequent two-way navigation. In the brownfield prototype, the first platform UI feature arrived one release late because its plugin lacked the new native API; that outcome disqualifies Flutter when same-day platform adoption is part of the product promise.
Avoid React Native when JavaScript ownership is weak
React Native loses much of its organizational advantage when the team lacks strong React and TypeScript skills. It’s also risky when critical dependencies aren’t compatible with the mandatory New Architecture or when high-frequency native data dominates the application. When native traffic exceeds the product’s measured boundary budget or carries roughly 30 MB camera frames, the React Native plan includes a native module and allocated iOS plus Android maintenance capacity.
Avoid KMP when one UI team must ship everything
Native UI leaves two interface backlogs and two acceptance paths. A small startup without iOS capability can create a dependency bottleneck while pursuing native fidelity. Shared Compose UI changes the staffing equation, so evaluate it as a separate architecture with evidence for iOS interaction details and platform integrations.
A platform-exclusive product, a specialized media pipeline, or software tied tightly to one operating system belongs in a native candidate row. For a camera application that depends on new capture APIs on release day, direct platform access can outweigh shared-code economics across all three alternatives.
Frequently Asked Questions
What is the main difference between Flutter, React Native, and KMP?
Flutter places rendering, widgets, and most application behavior in the Dart and engine stack. React Native places React behavior above Fabric, JSI, TurboModules, and native components. KMP may share domain and data logic while retaining SwiftUI plus Jetpack Compose, or extend sharing into Compose Multiplatform. A payment feature crosses one plugin boundary in Flutter, JavaScript-to-native interop in React Native, or Kotlin-to-Swift plus separate UI paths in a native-UI KMP design.
How should a team choose among these mobile stacks?
Use the matrix’s lowest-confidence, highest-weight row as the decision rule. In the worked case, that row is payment SDK depth, so a successful payment upgrade resolves the choice without another general framework comparison.
What is the difference between KMP and Compose Multiplatform?
KMP is the underlying technology for sharing Kotlin code across targets. Compose Multiplatform is a UI framework built on that ecosystem, allowing Compose interfaces to run across Android, iOS, desktop, and other supported targets. KMP teams may share only domain and data logic while retaining SwiftUI plus Jetpack Compose, a low-risk brownfield starting point that keeps existing interface ownership intact.
Does React Native’s New Architecture eliminate performance problems?
Fabric, JSI, and TurboModules remove major limitations associated with the legacy bridge and improve interoperability. Thread ownership, object lifetime, list virtualization, and React rendering costs still remain. Oversized native payloads or synchronous work can miss frame budgets even with the current architecture, so profile the actual interaction in a release build and include teardown in the trace.
Can I migrate an existing native app gradually?
Yes. KMP is especially well suited to extracting one domain slice while preserving native screens. React Native supports brownfield embedding for bounded experiences, and Flutter offers add-to-app integration. Each path adds runtime, navigation, build, and lifecycle concerns. Expand after one bounded feature stays within its startup and memory budgets, produces a symbolicated crash inside the incident target, and rolls back without changing the on-device schema.
Which framework gives the best performance?
For custom animation, Flutter’s controlled renderer is the strongest starting hypothesis. Deep payment, camera, or Bluetooth SDK ownership moves KMP with native UI upward. A React-heavy team building conventional product screens gives React Native the staffing advantage. In the worked case, animation favors Flutter, payment SDK depth favors KMP, and team fit favors React Native; payment integration remains the unresolved row.
What the Next Platform Release Will Ask
In the worked React-heavy case, React Native remains the provisional selection until the payment pilot returns. The decision date is the next payment SDK beta; duplicate charging, missing native symbols, or an unowned fork immediately changes the selection to KMP with native UI.
- Choose Flutter when one product team needs a controlled visual system and can own plugin boundaries.
- Choose React Native when React expertise is a real organizational asset and New Architecture dependencies are verified.
- Choose KMP when existing native teams want to share high-value logic without surrendering platform control.
- Choose native development when platform-specific capability matters more than shared-code economics.
In the worked matrix, React Native leads at launch while the maintenance view exposes one weak point: a payment module with a single native owner. The architecture record assigns that module to the iOS owner and checkout lead, with duplicate charging, missing native symbols, or an unowned vendor fork recorded as disqualifying results.
Keep primary sources close. Use the Flutter 3.44 release record for SDK changes, the React Native 0.86 release record for runtime and Android behavior, and the Kotlin compatibility matrix for version-scoped toolchain limits. Record the exact compiler, framework dependency range, standalone tools, and supported native toolchain in the architecture decision; future upgrades can then reproduce the tested combination before changing it.
Before the next payment SDK beta, write React Native as the provisional choice and leave one field open for the fork result. The iOS module owner fills it after the upgrade rehearsal. A clean vendor upgrade retains the recommendation; an unowned fork triggers the pre-agreed KMP native-UI path and its iOS staffing request.